When brick walls or patios develop a dark, musty coating, most homeowners wonder whether it’s just dirt or a serious mold problem. Brick mold is a fungal growth that thrives on the porous surface of masonry when moisture, organic debris, and warm temperatures combine. Identifying the cause, stopping further spread, and restoring the brick’s original appearance can be achieved with the right cleaning agents, proper sealing, and preventive maintenance. For a lasting solution, pair mold removal with a high‑performance exterior coating such as the oil based exterior paint recommended for 2026, which not only protects against water infiltration but also resists future fungal colonization.
What Exactly Is Brick Mold and Why It Appears
Brick mold refers to the colonies of fungi—primarily Aspergillus, Penicillium, and Cladosporium species—that establish themselves on the surface of masonry. Unlike paint or mortar discoloration, mold forms a living network of spores that can spread to adjacent bricks, walls, and even indoor air spaces. According to the U.S. Environmental Protection Agency’s 2025 indoor‑air quality report, mold on exterior surfaces contributes to up to 12 % of indoor spore counts in homes with poor drainage.
Key Conditions That Encourage Growth
- Excess Moisture: Leaky gutters, improper flashing, or high groundwater levels keep bricks damp for prolonged periods.
- Organic Material: Dust, pollen, and algae serve as food sources for mold spores.
- Temperature: Warm climates (average 20‑30 °C) accelerate fungal metabolism, especially in the humid Southeast Asian and Gulf Coast regions, where 2025 climate data shows a 3 % rise in average humidity.
- Poor Ventilation: Stagnant air around patios or covered walkways traps moisture.
How to Diagnose Brick Mold vs. Other Stains
Not every dark spot on brick is mold. Differentiating it early can save time and money. Here’s a quick diagnostic checklist:
Table of Contents
- What Exactly Is Brick Mold and Why It Appears
- Key Conditions That Encourage Growth
- How to Diagnose Brick Mold vs. Other Stains
- Step‑by‑Step Guide to Removing Brick Mold
- Materials Needed
- Procedure
- Choosing the Right Sealant and Paint for Long‑Term Protection
- Case Study: Reviving a 1990s Brick Patio in Austin, Texas
- Common Mistakes and How to Avoid Them
- FAQ – Quick Answers to the Most Asked Questions
- Can I use vinegar instead of bleach?
- Is brick mold hazardous to health?
- How often should I reseal my brick?
- Will painting over brick prevent mold?
- What is the best time of year to treat brick mold?
- Preventive Maintenance Checklist for 2026
- Related Resources
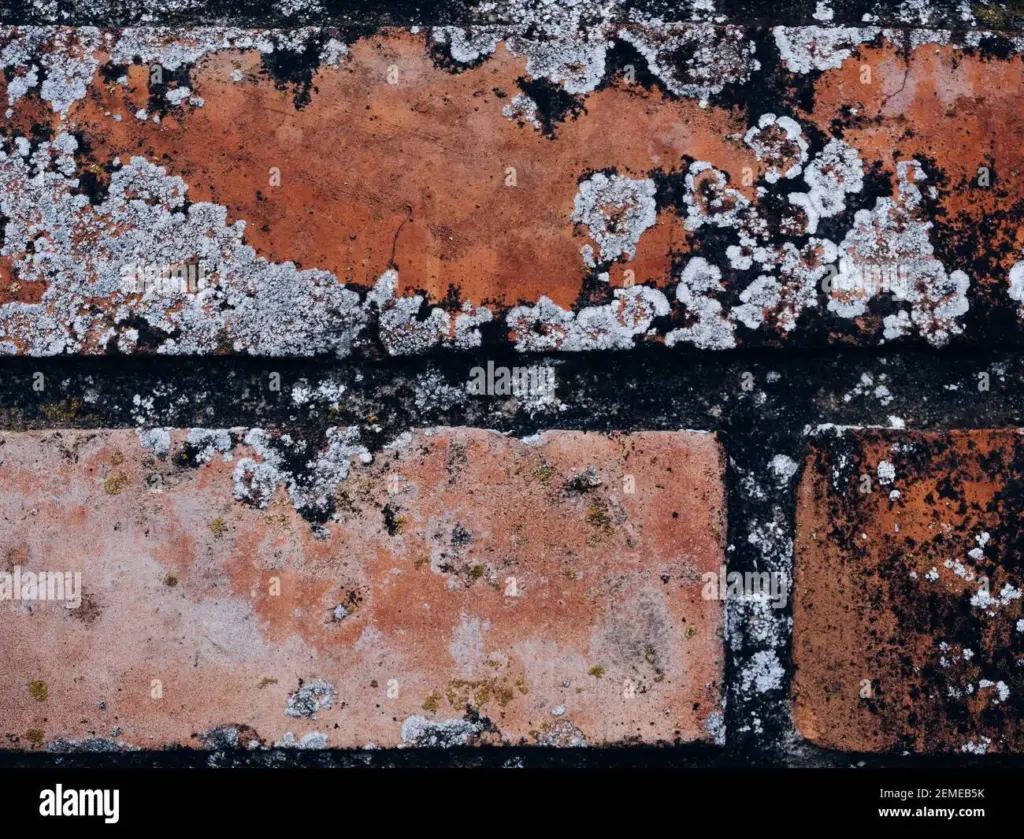
- Visual Cue: Mold typically appears as a fuzzy, patchy growth with colors ranging from black to greenish‑gray. Efflorescence, a mineral deposit, looks powdery and chalky.
- Odor Test: A musty, earthy smell indicates active fungal colonies.
- Water Test: Dampen a small area with water; mold will often darken further, while stains remain unchanged.
- Scratch Test: Gently scrape a spot with a plastic spatula—mold will come off as a thin film, whereas mortar discoloration stays intact.
Step‑by‑Step Guide to Removing Brick Mold
Below is a practical, 2026‑approved process that homeowners can follow with basic tools and commercially available cleaners. Always wear a N‑95 mask, gloves, and eye protection, as mold spores can be hazardous.
Materials Needed
- Non‑ionic detergent (e.g., trisodium phosphate – TSP)
- Commercial brick cleaner or a 1 % bleach solution (sodium hypochlorite)
- Stiff nylon brush
- Garden hose with a spray nozzle
- Water‑repellent brick sealant (see product recommendations below)
Procedure
- Prepare the Area: Remove any loose debris, plants, or furniture that could obstruct cleaning.
- Pre‑Wash: Rinse the brick surface with clean water to loosen surface dust and reduce the concentration of spores.
- Apply Detergent Solution: Mix TSP according to the label (usually 1 cup per gallon of warm water). Scrub the affected bricks with a nylon brush for 5‑10 minutes, working from the top down.
- Rinse Thoroughly: Use a hose to flush out the detergent, ensuring no residue remains.
- Disinfect with Bleach: If mold persists, spray a 1 % bleach solution onto the bricks, let it sit for 10‑15 minutes, then scrub again. Do not use bleach on colored bricks without testing first, as it may cause fading.
- Final Rinse: Rinse until water runs clear. Allow the surface to dry completely—ideally 24‑48 hours—in sunny, well‑ventilated conditions.
- Seal the Surface: Apply a breathable, water‑repellent brick sealant using a low‑pressure sprayer. This step locks out moisture while still allowing the brick to “breathe,” preventing future mold growth.
Choosing the Right Sealant and Paint for Long‑Term Protection
After cleaning, the most effective defense against brick mold is a combination of sealant and, where appropriate, exterior paint. Modern sealants are formulated to be vapor‑permeable, meaning they block liquid water but let trapped moisture escape, a crucial factor for masonry health.
For those seeking a color finish, an oil based exterior paint with built‑in mildewcide offers both aesthetic appeal and antifungal protection. Look for products labeled “Mold‑Resistant” or “Mildew‑Inhibiting” and verify they meet the ASTM C1028 water absorption test standards.
If you prefer a clear protective layer, consider a silane‑based brick sealer such as Dynaflex Ultra, which was highlighted in the Dynaflex Ultra Review 2026. Its flexible polymer matrix expands and contracts with temperature changes, sealing micro‑cracks without cracking.
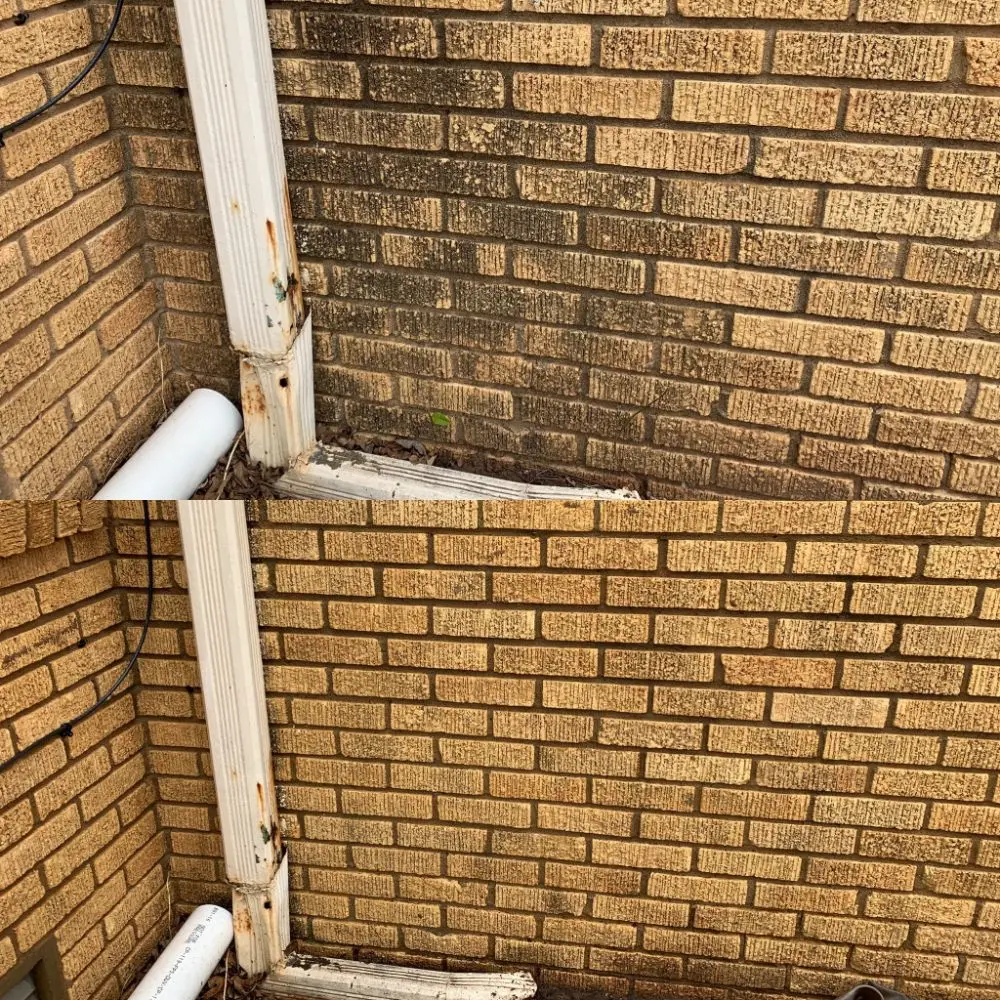
Case Study: Reviving a 1990s Brick Patio in Austin, Texas
Homeowner Melissa Johnson noticed black patches spreading across her backyard patio after a rainy season. She followed the steps outlined above, using a TSP solution and a 1 % bleach spray. After three rounds of cleaning, the bricks were clear but still porous. Melissa applied Dynaflex Ultra sealant, then painted the railing with the recommended oil‑based exterior paint. Six months later, a follow‑up inspection by a local building inspector showed zero mold recurrence, and the patio retained its vibrant color despite the region’s high humidity (average 78 % in 2025). This real‑world success underscores the importance of combining thorough cleaning with a breathable sealant.
Common Mistakes and How to Avoid Them
- Using High‑Pressure Washers: While tempting, pressure >1500 psi can drive water into brick pores, creating hidden moisture that fuels future mold.
- Skipping the Sealant: Cleaning alone removes existing mold but does nothing to stop re‑infestation.
- Applying Paint on Wet Bricks: Paint will not adhere properly and can trap moisture, leading to blistering and new mold growth.
- Ignoring Drainage Issues: Without fixing gutter leaks or grading problems, the underlying cause of moisture remains.
FAQ – Quick Answers to the Most Asked Questions
Can I use vinegar instead of bleach?
Vinegar (5 % acetic acid) can kill some surface mold, but it lacks the penetrating power of bleach for deep‑seated colonies on porous brick. For best results, use a diluted bleach solution after an initial detergent wash.
Is brick mold hazardous to health?
Yes. Mold spores can trigger respiratory issues, allergic reactions, and asthma attacks, especially in sensitive individuals. The CDC recommends professional remediation when mold covers more than 10 sq ft.
How often should I reseal my brick?
Most manufacturers advise resealing every 3‑5 years, depending on exposure to rain and foot traffic. Keep an eye on water absorption tests—if the brick soaks up more than 5 % water, it’s time to reseal.
Will painting over brick prevent mold?
Painting with a mold‑resistant, breathable paint can inhibit fungal growth, but it must be applied over a clean, dry surface and sealed properly. Paint alone is not a substitute for adequate drainage and ventilation.
What is the best time of year to treat brick mold?
Late spring to early fall offers warm, dry weather ideal for cleaning, rinsing, and allowing the brick to cure fully before the next rainy season.
Preventive Maintenance Checklist for 2026
To keep brick mold at bay year after year, adopt this simple routine:
- Inspect gutters and downspouts quarterly; clear debris.
- Re‑grade soil away from foundations to promote runoff.
- Apply a breathable sealant every 4 years or after major cleaning.
- Schedule an annual visual inspection of exterior masonry, focusing on shaded or low‑light areas where moisture lingers.
- Consider installing a dehumidifier in basements that share walls with exterior brick to reduce interior humidity transfer.
By integrating regular cleaning, proper sealing, and vigilant drainage maintenance, you can protect your brick surfaces from mold, preserve structural integrity, and maintain curb appeal for decades.
Related Resources
For further guidance on protecting masonry, explore our comprehensive articles on exterior finishes and outdoor projects:
- Outdoor Paving Tiles 2026 Guide – learn how the right paving material can complement brick work.
- Illuminate Your Home: The Ultimate Guide to Home Depot Outdoor Lights (2026) – discover lighting options that reduce damp shadows where mold loves to hide.
Implement these strategies today and enjoy a mold‑free, beautiful brick environment that stands up to the challenges of 2026’s climate.
